


What is Github Actions
Github Actions is a CI/CD tool that allows you to automate your software development workflows. It is a powerful tool that allows you to automate a wide range of tasks, from building and testing your code to deploying your application to production.
Components
Let's start with the basic. There are three main components of Github Actions.
Workflows
A workflow is a configurable automated process that will run one or more jobs. Workflows are defined by a YAML file checked in to your repository and will run when triggered by an event in your repository, or they can be triggered manually, or at a defined schedule.
Workflows are defined in the .github/workflows directory in a repository. Each file is a YAML file that defines a workflow. One repository can have multiple workflows for different purposes like testing, building, and deploying.
Example
name: Build and Deploy
on: push
jobs:
  build:
  ...
Workflow templates
For common workflows, you can use workflow templates. Workflow templates are pre-defined workflows that you can use in your repository.Github provide workflow templates for various language and tool. You can learn more about using workflow templates in the GitHub Actions documentation.
Events
Events are the triggers that cause a workflow to run. They can be anything from a push to a pull request and manual triggering to a cron schedule. You can find the list of events in the GitHub Actions documentation.
Events are defined in the on property of a workflow file. You can set to multiple events to trigger a workflow by defining them in an array. eg.on: [push, pull_request,folk].
For example, the following workflow will run when a push is made to the main branch:
Activity types and filter patterns
You can use activity types and filter patterns to refine the trigger when a workflow should run.
Let's start with Activity types. Activity types are the types of events that can trigger a workflow. For example, a pull_request is an event to trigger the workflow. pull_request has many activity types. For example, opened, review_request,synchronize, closed, reopened, etc. By default, a workflow only runs when a pull_request event's activity type is opened, synchronize, or reopened. You can trigger a workflow for different activity types by using the types property.
Now let's talk about filter patterns. Filter patterns allow you to refine the trigger by specifying additional conditions like branches,tags and path. Let me show you the example.
Example
name: Build and Deploy
on:
  pull_request: #event
    types: #only pull request with these activity-types will trigger the workflow
      - opened
      - closed
    branches: #filter-pattern
      - main #only pull request to main branch will trigger the workflow
  push: #event
    branches: #filter-pattern
      - main #only push to main branch will trigger the workflow
    paths: #filter-pattern
      - "api/**" #only push to api folder will trigger the workflow

jobs: ...
Steps
Before talking about jobs, we need to know about steps. So what are steps? Steps are individual tasks or actions that make up the jobs. They are defined in the steps list of a workflow file and are executed sequentially in the job's runner environment. Steps can be commands, actions, or scripts that automate specific tasks like testing, building, and deploying for CI/CD.
Example
steps:
  - name: Run Tests
    run: npm test

  - name: Build Project
    run: npm run build

  - name: Deploy
    run: |
      echo "Deploying application..."
Actions
Actions are pre-built components that provide reusable capability to perform specific task(Step) to use in jobs for various repository and workflows. They can be created by you, developers from community and organization for reusability across the repository. There is a ton of pre-built actions from checkouting code to deploy to cloud server of your choice. You can browse for various actions in GitHub Marketplace. There are two kind of actions. The one from verified creators like Github itself. Those actions can be used with confidence. The other kinds is those from other creators. If you want to use those actions, :warning: it's adivce that before you start using it you have to check its source code throughly yourself if they handle repository as it should be
Example
steps:
  - name: Checkout Code
    uses: actions/checkout@v4
Jobs
Jobs are the building blocks of workflows. A workflow can have one or more jobs. Each job is an independent unit of work that can be executed in parallel or sequentially. Each job run on associated virtual server but here we call those runner.They can be Linux,Mac and Windows runner .There are two types of runner, GitHub-hosted runner managed GitHub and self-hosted runner managed and maintain outside of GitHub by yourself. Jobs are defined in the jobs list of a workflow file.
Example
name: Example Workflow
on: push

jobs:
  script-job:
    name: Running Custom Script
    runs-on: ubuntu-latest

    steps:
      - name: Run Script
        run: |
          chmod +x myScript.sh
          ./myScript.sh

      - name: Build Output
        run: cat dragon.txt
If you run this workflow, you will see the following output:

As you can see, Run Script step fails and upcoming steps are skipped.The error indicates that no such file or directory exists in Run Script step. Why? Because initially runners don't have the file of our repository. So like we need to clone to our local machine from GitHub repo, we need to clone to our runner. Thankfully, GitHub Actions provides a pre-built action for that. Let's add that action to our workflow.
steps:
  - name: Checkout Code
    uses: actions/checkout@v4
  - name: Run Script
    ....
We add a new step for checking out the code before Run Script step. Now push it and let trigger the workflow. Now you should see the workflow run successfully.
As mentioned above, jobs will be executed in parallel by default. Let's see an example for it.
name: Parallel Multiple Jobs
on: push

jobs:
  build_job_1:
    name: Build State
    runs-on: ubuntu-latest
    steps:
      - name: Install package
        run: sudo apt install cowsay -y

      - name: Generate build file
        run: cowsay -f dragon "I am fooking dragon.. Let's burn them all" >> dragon.txt

  test_job_2:
    name: Testing
    runs-on: ubuntu-latest
    steps:
      - name: Check if build exist
        run: sudo grep -i "dragon" dragon.txt
Sadly, above workflow will fail. If you look at the code, we generate a txt file in Build State job. And then we try to test it in Testing job. But the problem is, these two jobs are running in parallel. So the Testing job will run before Build State job is finished. In that case, we need to run these job sequentially. We can do that by using needs keyword. Let's do that.
name: Series Multiple Jobs
on: push
jobs:
  build_job_1:
    name: Build State
    runs-on: ubuntu-latest
    steps:
      - name: Install package
        run: sudo apt install cowsay -y

      - name: Generate build file
        run: cowsay -f dragon "I am fooking dragon.. Let's burn them all" >> dragon.txt

  test_job_2:
    needs: build_job_1
    name: Testing
    runs-on: ubuntu-latest
    steps:
      - name: Check if build exist
        run: sudo grep -i "dragon" dragon.txt

  deploy_job_3:
    needs: test_job_2
    name: Deployment
    runs-on: ubuntu-latest
    steps:
      - name: Running The Build
        run: cat dragon.txt
Now go check the action tab in your Github repository.

Opps, it still fails.Don't be panic. At least, it run sequentially as we intended:relieved:. If one of the preceding jobs fails, the subsequent jobs will automatically be skipped. Okay ninja, we have a fail job to debug. Let's go.
Below is the log i found by clicking on the fail job

We clearly generate that file in build state, right? Then why does it saying No such file or directory. Remeber, it's said in above that a job is associated with a runner. What is a runner? It's a server or vm, right? So even if those three jobs are running one after another, they are still running on each machine.
Here's the time for artifacts to shine.
What are Artifacts?
Artifacts are files or datas that generate during a job on its associated runner. They can be used to share data between jobs and store build or test output. Normally, artifacts will be deleted after the job compeled.
So now we know the existance of artifacts to save your day. But how do we share them across jobs with respective runner. Don't worry. There is already a verified action for uploading artifacts from a job and downloading artifacts from others.

Let's use them in our workflow.
name: Series Multiple Jobs
on: push
jobs:
  build_job_1:
    ...same as above
    steps:
      ...same as above
      - name: Upload Artifact #<<<upload-artifact
        uses: actions/upload-artifact@v4 #<<<prebuilt-action
        with:
          name: dragon.txt #<<<name/of/artifact
          path: dragon.txt #<<<path/to/artifact/file

  test_job_2:
    ...same as above
    steps:

      <!--
        In downloading case, we need to run this step first.
         Otherwise it will fail as there is no file when the test run
      --!>
      - name: Download Artifact #<<<download-artifact
        uses: actions/download-artifact@v4 #<<<prebuilt-action
        with:
          name: dragon.txt #<<<name/of/artifact
      # In this case we don't need to specify path as it will be downloaded to current directory
      ...same as above

  deploy_job_3:
   <!--
   This will be the same as test_job_2
   -->
Now if you push the code again, you will see all workflows are completed successfully.Now check into the run workflow's summary. you will see the build file in the artifacts section. You can download it and check the content or delete if you want. By default, artifacts are stored for 90 days. You can change it in the settings.
Matrix Jobs
You want to run the same job with different configurations like different runners, different versions of a package, different versions of a language, etc. You can use matrix jobs instead of creating multiple jobs for each configuration. These jobs will run in parallel.
name: Matrix Jobs
on: push

jobs:
  deploy:
    strategy:
      fail-fast: false
      max-parallel: 3
      matrix:
        os: [ubuntu-latest, ubuntu-20.04, windows-latest]
        images: [hello-world, alpine]
        exclude:
          - images: alpine
            os: windows-latest
        include:
          - images: mcr.microsoft.com/windows/nanoserver:ltsc2022
            os: windows-latest
    runs-on: ${{matrix.os}}
    steps:
      - name: Docker Run ${{matrix.images}}
        run: docker run ${{matrix.images}}
Okay, let's break it down.
strategyis a keyword that tells Github to run the job with different configurations.fail-fastis a keyword with default valuetruethat tells Github to fail the remaining jobs if one of them fails.max-parallelis a keyword that tells Github to run the maximum jobs in parallel.matrixis a keyword that tells Github to run the job with different configurations.osandimagesare keys of your own choice for your respective configurations.
Let's forget the exclude and include for a while and focus on the os and images. We have three os and two images. So we will have 6 combinations. But there might be a case where you don't want to run a combination. Like we can't run bash script on windows. So we can exclude it. In the example above, we have excluded windows-latest with alpine image and included windows-latest with window nano server image. Let see the results

You can see total of 6 jobs and windows-latest with alpine image is skipped and windows-latest with window nano server image is added.
Env Variables and Secrets
Imagine when you are creating your workflow to build docker image, push it to docker hub, and deploy it to your server. You will need to pass the images name in multiple places. You can hardcode it but that's not a good practice. And we, humans, love to make mistakes and by retyping same words, the grow of our love will be multiply. So we need to use env variables.
Env Variables
In workflows, you can define env variables in multiple ways.
- In the workflow file itself
- In the repository settings
Let's take a look at the first one. We can define env variables in different scopes or levels. For example, we can define env variables for the whole workflow, for a job, or for a step. Variables defined in a higher scope will be override by variables defined in a lower scope. For example, variables defined in the workflow level will be override by variables defined in the job level. Variables can be defined using the env keyword.
Let's see it in action.
Wait! Before that, there are two ways to access env variables. The first one is using dollar sign in front of the variable name, like $SOME_NAME. The second one is using ${{env.VARIABLE_NAME}} syntax. Here is some spoilers for you. The second one is called as env context. There are many contexts in github actions you can use in your workflow. I will talk about them below or not.
Okay, let's define env variables in the workflow file.
name: Env Variables
on: workflow_dispatch
env:
  IMAGENAME: WF_name
  TAG: latest
  USERNAME: WF_user
  PASSWORD: Strong_password

jobs:
  build_job_1:
    name: Build Image
    runs-on: ubuntu-latest
    env:
      IMAGENAME: "JB_name"
    steps:
      - name: Build Image
        env:
          IMAGENAME: "ST_name"
        run: echo docker build -t ${{env.IMAGENAME}}:${{env.TAG}} .
      - name: Login to Docker Hub
        run: echo docker login -u $USERNAME -p $PASSWORD
      - name: Push Image
        run: echo docker push docker.io/$USERNAME/$IMAGENAME:$TAG
      - name: Deploy Image
        run: echo docker run docker.io/$USERNAME/$IMAGENAME:$TAG
Okay, let's see this workflow in action. Beaware that i used workflow_dispatch trigger. So you will need to trigger it manually. I only use a simple trigger. If you want to know about _mannully running workflow with inputs and stuff go check here_ .And i only used echo command. Because why not?
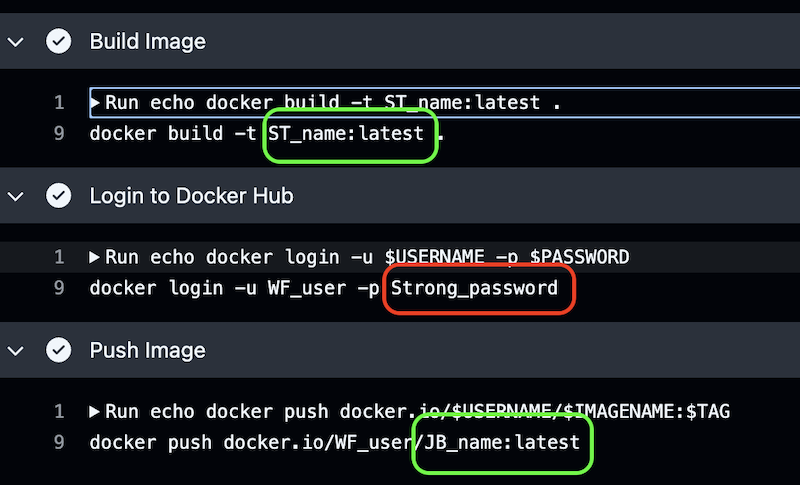
As you can see, in Build Image step, the image name is ST_name because we defined env in that step level. In Push Image step, the image name is JB_name as the env variable is only defined in the job level. We will get error if it's actually pushing the image that doesn't exist. But we are just demostrating here, who care. Don't worry about the login step right now. We will talk about it below.
Secrets
As you can see in the red circle. If you use variable they can be seen by anyone. You are doomed if you exposed your secret keys like password, api key, etc. That's what secrets are for. Secrets are like env variables but they are more secure. They are stored in Github and can be accessed by the workflow. They are also encrypted and can be accessed by the workflow. They can be stored in the repository settings, repository environment or organization settings. They can be accessed by the workflow using the secrets context.
Go to the repository settings, under Security, click on Secrets and Variables and choose Actions.

Click on New repository secret. and create a new secret. To use the secret in the workflow, you can use the secrets context. Like in the below example, we are using the DOCKER_PASSWORD secret.
Okay, do you guys remember i mentioned that variable can be defined in the repository settings? Well, you can see that variables i highlighted in the image above? You can click that and define it there. If you want to use it in the workflow, you can use the
varscontext following variable name.
   ...
   - name: Login to Docker Hub
     run: echo docker login -u ${{vars.DOCKER_USERNAME}} -p ${{secrets.DOCKER_PASSWORD}}

Now, password is encrypted and no one can see it anymore.
Context
Contexts are like variables that are available in the workflow. They are used to access information about the workflow run, the repository, the job, and the step, the runner, etc. They are accessed using the ${{<context>}} syntax. We have used some of the context like secrets,vars and env. There are many contexts available in Github Actions. You can find them here.
Concurrency
By default, Github Actions will run all the workflows, jobs, and steps in parallel. So if you are working on a project with multiple developers, it could lead to unexpected results. To prevent this, you can use the concurrency keyword. You can use concurrency in workflows level or job level.
Example for workflows level:
name: Concurrency
on: workflow_dispatch
concurrency:
  group: ${{ github.workflow }}-${{ github.ref }}
  cancel-in-progress: true
jobs:
Example for workflows level:
name: Concurrency
on: workflow_dispatch
jobs:
  build_job_1:
  name: Build Image
  runs-on: ubuntu-latest
  concurrency:
    group: deploy_group
    cancel-in-progress: true
We have to specify two keywords in concurrency. The first one is group and the second one is cancel-in-progress. The group keyword is used to specify the group name. Value of group can be any string(!Note: they are case insensitive) or expression. But for expression you can only use github,inputs and vars. The cancel-in-progress keyword is used to cancel the running workflow if another workflow with the same group name is triggered. If you don't want to cancel the current running workflow when a new workflow start, you can set it to false. You can learn more about concurrency here.
Goodbye!
Now it's time to say goodbye as most of the fundamentals of Github Actions have been covered. There's one thing i left out. That's the expressions. You can learn about expressions here. I hope you enjoyed this and learned something new. If you have any questions, go ask ChatGPT . Just Kidding, feel free to ask me. I will be happy to help you. Thank you for reading. If you like this article, please share it with your friends and colleagues and subscribe to my newsletter to get notified about new articles.